Wednesday, August 9, 2023

How to make Oats Idli with Tiffin Sambar in 30 minutes | Yummy Breakfast Combo Made Easy with Flipkart | Masterchefmom

 Hi Supermoms,

Mornings are always busy, and action packed since we need to do so many things before, we can get ready and hit the road running. One of things we should never ignore is the breakfast which is the most important meal of the day. How to manage your time and at the same time ensure you can make tasty and nutritious breakfast!


I am going to show you how to make delicious Oats Idli with a super duper “Quick Tiffin Sambar” in less than 30 minutes. Well, you too can make it happen if you have all the right kitchen and cookware essentials from Flipkart. These new additions to my kitchen has really helped me in making my cooking process quicket, thanks to Flipkart! You can shop them and more from this link here and make some amazing food, starting with this amazing breakfast combo.Let me know how it turned out.


Firstly, you need the Greenchef Vesta Idli maker. It's like magic! With its six plates, you can make a whopping 24 soft and fluffy Oats Idlis at one go! 


Next make sure you have the Butterfly Premium Vegetable Chopper. Trust me, this little wonder is a game-changer! It's designed to save you time and effort, especially when it comes to chopping carrots and herbs. Just pop them in and pull the string a few times, and here we go, perfectly chopped veggies ready to add to your Idli batter! 


Now comes my kitchen buddy, the Yelona Stainless Steel knife Set. It's like a superhero in the kitchen with its incredible sharpness! Chopping onions and tomatoes used to be a bit of a hassle, but with this knife, it's a piece of cake! 


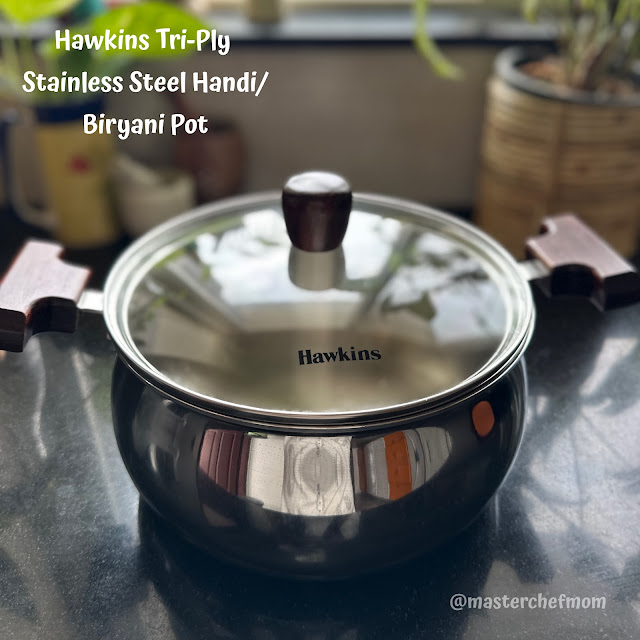
Finally my personal favourite, the sturdy Hawkins Tri Ply Stainless Steel Handi with a glass lid and the wooden spatula set from Flipkart. They are the ultimate cooking duo! The pan distributes heat evenly, making sure your Sambar turns out finger-licking good, and the spatulas make stirring a pleasure!


Are you ready now with all the kitchen appliances and utilities?

 Let's make the delicious breakfast combo of Oats Idli and Quick Tiffin Sambar.


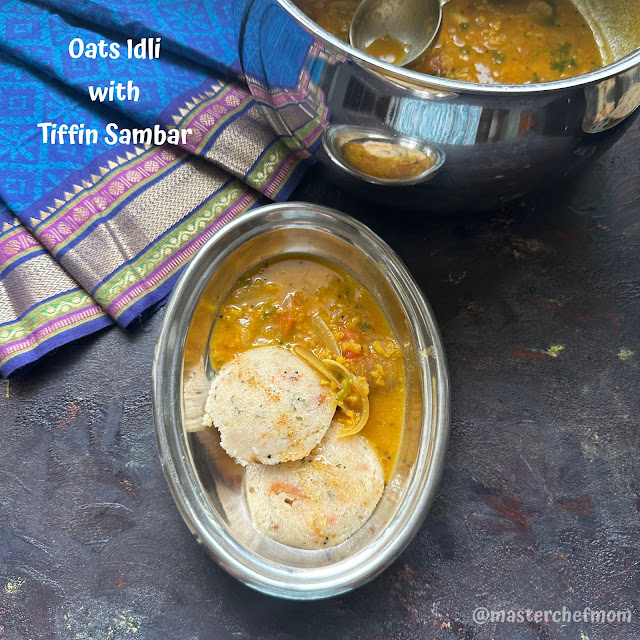
Oats Idli with Tiffin Sambar

Oats Idli :

Preparation time :5-7 minutes

Cooking time: 12 minutes

Makes: 16 idlis

1 cup = 250 ml cup


Ingredients:

1 cup quick cooking oats

1 cup rava/sooji

1 cup curd

1 +1/4 cup water

1/4-1/2 tsp baking soda

salt to taste


To temper:


2 tsp oil

1 tsp chana dal

1 tsp urad dal

1 tsp mustard seeds

10 cashew nuts (halved)

1 carrot( finely chopped)

1 green chilli( finely chopped, adjust)

handful of coriander leaves(finely chopped)


Method: 

1. To a wide bowl/vessel, add oats, rava, curd and mix well adding water.

2. Using the Butterfly Premium vegetable chopper, finely chop vegetables of your choice.

3. Heat a pan and temper with ingredients given for the same and add it to the Idli batter.

4. Add salt, baking soda and mix well. Adjust water quantity if required.

5. Take the Idli Moulds out of the Greenchef Vesta Idli Maker and properly grease them;

6. Pour the batter on to the moulds. Adjust the quantity depending on the size of the Idlis you like;

7. Steam them for approx. 12 minutes and switch off.


Yummy Oats Idli is now ready!


Quick Tiffin Sambar:


Preparation time: 5 minutes

Cooking time:20 minutes

Serves: 3-4

1 cup = 250 ml cup


Ingredients:

1 large onion (thinly sliced)

1 large tomato (cubed)

1 green chilli (adjust)

1 sprig curry leaves

1-2 tbsp moong dal

1 tsp besan/gram flour

3.5 cups water

1/8 tsp turmeric powder

1.5 tsp sambar powder

salt to taste

coriander leaves to garnish


To temper:

2 tsp sesame oil

pinch of asafoetida

1/2 tsp mustard seeds


Method:

1. Heat the heavy bottomed Hawkins Tri Ply Stainless Steel Handi with oil and temper with ingredients given for the same.

2. Add the chopped vegetables, turmeric powder, salt and cook for 2-3 minutes.

3. Add 1 cup of water, moong dal, curry leaves , cover and cook till the moong dal is 70% done.

4. Gently mash/whisk the moong dal, add sambar powder, more water, cover and cook for another 10-12 minutes.

5. Now, mix besan with 1 tablespoon of water and add it to the sambar mixture.

6. Let it cook for another 5 minutes, garnish and switch off.


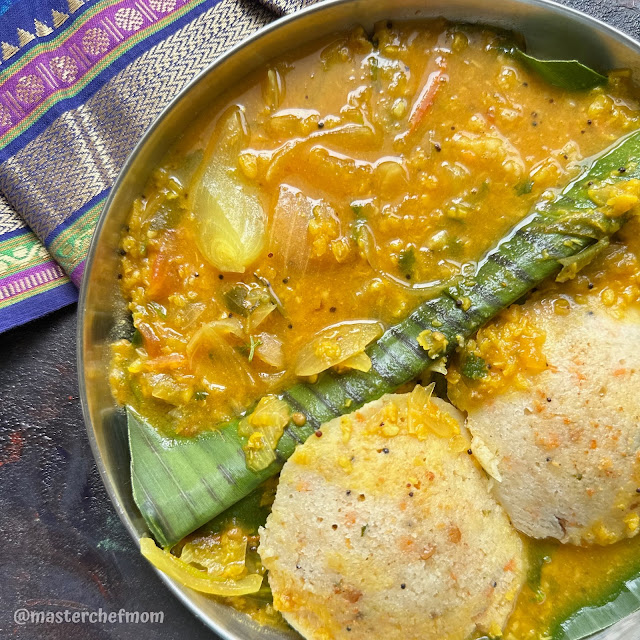
Delicious Tiffin Sambar is now ready to be served along with tasty Oats Idli.

Oats Idli with Tiffin Sambar
 

So, get your hands onto these amazing kitchen utilities at reasonable prices on Flipkart for this limited season.Also, try this amazing breakfast combo and share your feedback with me.


Happy Cooking!


With love,


Masterchefmom


Thursday, November 24, 2022

My Mother-In-Law's Parangikkai Paal Kootu | Yellow Pumpkin Milk Curry | Heirloom Recipe


 'Paal' means ‘Milk’ in Tamil Language. ‘Kootu’ means ’Together’. The Parangikkai Paal Kootu is a traditional recipe that is made using milk and yellow pumpkin. The light sweetness of the pumpkin makes it the most ideal vegetable  for this curry. I have earlier shared my mother's  'paal kootu ', where she uses baby pumpkin and also uses coconut in the spice mixture. Then, I have shared my version of the Paal Kootu without coconut. https://masterchefmom.blogspot.com/2018/03/parangikkai-paal-kootu-yellow-pumpkin.html


Today, I am sharing my Mother -in-law’s version of the kootu. She makes it using jaggery and it is so delicious. It is the season for yellow pumpkin recipes and I am so thrilled to share this simple yet tasty and traditional recipe with all of you. I have grown up watching my grandfather and my father relishing the paal kootu. If you are a person who likes the spicy-sweet combination, then this dish is for you. 


This paal kootu tastes best along with a spicy gravy. My grandmother would make serve it as a side dish to Vathal Kuzhambu or Mendhi/Vendaya Kuzhambu.


Paal Kootu Recipe

This recipe can be made within minutes. If you are vegan, you can substitute dairy with coconut milk , oat milk, cashew milk, soy milk or almond milk. We all know the numerous health benefits of yellow pumpkin , especially to our skin and this recipe is a great way to incorporate it in our weekly diet. 


Parangikkai Paal Kootu by Masterchefmom


Recipe Courtesy:  Prema Pattabiraman


Preparation time : 10 minutes

Cooking time : 20 minutes

Serves : 4

1 cup = 250 ml cup


Ingredients :


250 gm yellow pumpkin ( peeled and cubed)

1/8 tsp turmeric powder

1/2 cups milk  

1-2 teaspoon jaggery ( adjust according to taste)

1/2 teaspoon salt


To Grind:


1 teaspoon rice flour 

1/4 cup fresh coconut

1 green chilli ( add more depending upon your spice requirement)

1/4 cup water 


To temper :


1-2 teaspoon coconut oil

1/2 teaspoon mustard seeds

1/2 teaspoon urad dal

1-2 dry red chillies (adjust)

1 sprig curry leaves 


Note: The green chilli I used is the very spicy variety. So, just one chilli was good enough. But do adjust the quantity depending upon the variety of chilli you are using. Also, if you gravy becomes too thick, you can add little more milk.


Pre-Work:


1.Peel the the yellow pumpkin skin and chop them into medium size cubes. They should not be too large or too small. 

2.Ready the fresh coconut or frozen. If you are using fresh coconut, then break open a coconut make small cuts and remove the pieces. Then if the skin is too thick, peel them and chop them into small pieces. If you have already done it and have the chopped pieces in the freezer, bring it out and allow it to thaw. You will need just 1/4 cup of coconut.

3.Decide the type of milk you would like to use and keep it ready

4.Check if you have rice flour


Now, you are ready … let’s cook the  Paal Kootu 


Method :


  1. To a kadai, add the cubed yellow pumpkin and add 1 cup of water. 
  2. Add turmeric powder, salt and allow the pumpkin to cook well. They have to be soft.
  3. In the meantime, add all the ingredients given under ‘To grind’ in a mixer and grind it to a smooth paste.
  4. Once the pumpkin is cooked, add the ground mixture, jaggery, milk and cook for just 3-4 minutes and switch off.
  5. Temper the kootu with ingredients given under ‘To temper’ and pour it into the kootu. 


Paal Kootu Recipe

Your delicious Parangikkai Paal Kootu is now ready to be served!


Do try and share your feedback with me.


Happy Cooking!


With love,


Masterchefmom


Wednesday, November 23, 2022

Mushroom Pasta | Easy and Quick Macaroni Using Mushrooms | Lunch Box Idea By Masterchefmom


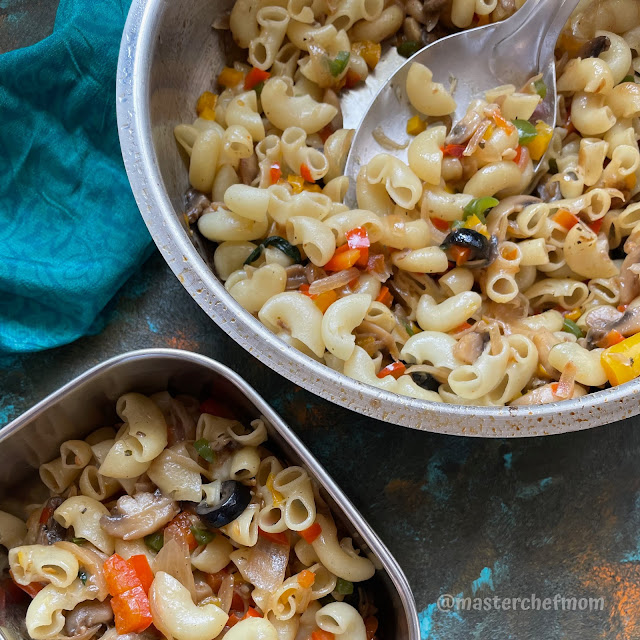
Mushroom Pasta

Hi Supermoms,

Let me share a secret with you....

I love Pasta 💖 .  I am always excited to make different kinds of pasta . Recently I had shared the Macaroni Pie Recipe with all of you. Hope you try it out soon. 

Today, I am sharing a tasty and easy to make pasta dish using mushrooms. It comes together so quickly and is a perfect lunch box recipe too. You can always personalise the dish depending upon your taste preference. You can use vegetables of your choice and keep the pasta more colourful. 

Even without any sauce, this pasta is sure to impress everyone. Here is a special tip for those packing the pasta for lunch box. Just add a few tablespoons of water that you have used to boil pasta. This way, the pasta does not dry up and is super fresh and tasty during lunch time. 

Now, let me share the recipe...

Mushroom Pasta


Mushroom Pasta | Mushroom Macaroni By Masterchefmom

Preparation time: 10 minutes
Cooking time: 20 minutes
Serves: 1 adult or 2 children
1 cup = 250 ml cup

Ingredients:

1 cup macaroni (you can use pasta of your choice)
12 button mushrooms (1 box)
2-3 garlic cloves( finely chopped)
1 onion( thinly sliced)
1/4 cup coloured bell peppers
2-3 tsp black or green olives (optional)
4-5 basil leaves (fresh or use 1/2 tsp dry seasoning)
1/8 tsp black pepper powder(adjust)
1 tablespoon Olive oil
salt to taste

To Garnish:

grated cheese as per liking

Note: 

1. Adjust the quantity of pasta depending upon the number of people you are going to serve.
2. Instead of black pepper powder, you can always use white pepper powder or chilli flakes. 
3. Do not throw away the water that you use to cook pasta. 
4. If you are vegan, just skip cheese. Still tastes delicious.

Method:

1. Heat a pan with olive oil.
2. Add finely chopped garlic and fry them till they are slightly brown.
3. Add onion and fry them till they turn slightly brown. This is an important step.
4. Now add mushrooms, black pepper powder, salt and allow the mushrooms to cook. 
Note: This step takes 5-7 minutes. You can boil your pasta while the mushrooms are cooking.
5. Once the mushrooms are well done, add coloured bell peppers, olives, basil leaves and let it cook for just 1-2 minutes on low flame. 
6. Drain the pasta and add it to the cooked vegetables.Add grated cheese and a few extra teaspoons of the pasta water, mix and switch off.

That's it! Your Mushroom Macaroni is now ready! Enjoy it with few pieces of toasted bread or pack them for lunch box. Either way they are just so yummy!

Mushroom Pasta


Happy Cooking!

With love,

Masterchefmom


Tuesday, November 22, 2022

Lauki Khichdi | Bottle Gourd Khichdi Recipe | One Pot Gluten Free Recipe


Lauki Khichdi

 Hi Supermoms,

I often resort to comfort desi foods or Pasta 😁. One of my favorite comfort meal is our own “super food”, the "Khichdi". I love my Khichdi with potatoes or fresh seasonal vegetables like carrots, peas, Bottle-gourd etc. Yes, you read it right! Bottle-gourd or what is popularly called Lauki makes an excellent Khichdi ingredient.


Winter has set in and the vegetables are so fresh. The lauki that you get these days are so tasty. I made a very cheerful, soulful bowl of Lauki Khichdi, the recipe of which I am sharing in this blog. This Khichdi is not only soothing to your stomach but will also cleanse your palate especially when you have been eating outside food for many days in a row and longing for a home cooked meal.


The best part is that it requires very less effort to cook it. I made a quick one pot meal and enjoyed with lots of ghee, papad , achaar/pickle and dahi/curd. I am always generous with my ghee😀, how about you?


I know that some of you think that Khichdi is boring, bland or tasteless. Just try making this Khichdi. You will love it. 


If you do not have bottle gourd in your pantry, try using potatoes or carrots. You can make the simple plain  version with just a tadka / tempering if you don’t want any veggies in your Khichdi.


Go ahead and make yourself this superfood.


Lauki Khichdi


Lauki Khichdi By Masterchefmom

Preparation time: 10 minutes

Cooking time: 20 minutes

Serves- 2-3

1 cup = 100 ml cup


Ingredients:

2 cups bottle gourd/lauki ( peeled and chopped into small pieces)

1 cup raw rice 

1/2 cup yellow moong dal

1/4 tsp turmeric powder

handful of coriander leaves(finely chopped)

salt to taste

To Temper:

2-3 tsp ghee

1/2 tsp jeera/cumin seeds

large pinch asafoetida/hing

2-3 garlic cloves (finely chopped)

1-2 green chilli 

1 sprig curry leaves

Important Note : If you are vegan, substitute ghee with coconut oil.

Pre-Work:

1. Take one cup rice and 1/2 cup moong dal in a bowl and wash it at least 2 times. Drain excess water and set it aside. You can also add 6 cups water to the mixture and allow it to soak. Adjust water quantity depending upon the type of rice you are using.

2. Peel the bottle gourd and chop them into smaller pieces. This way, it melts in the mouth when you eat. 

3. Finely chop garlic. You can use both red and green chilli for this khichdi. It is surely a personal choice. The green chillies I get now are really spicy. So, just one green chilli was sufficient. Also, I do not chop or make a slit in the chilli. The khichdi has to be soothing both to the palette and stomach😀. So, I kept the khichdi mildly spicy. This way, it appeals to everyone in the family. 

Now that everything is ready, let's start cooking the Lauki Khichdi..

Method:

1.  Heat  pressure cooker with ghee.

2. Temper with ingredients given under "To temper".

3. Add the washed rice and dal mixture with water. If haven't soaked the dal, rice mixture, just add  water ( 2.5 times the quantity of rice and dal)

4. Add salt and half the quantity of coriander leaves.

5. Pressure cook on low/medium flame for 3-4 whistles. 

6. Switch off.

7. Once the pressure releases, open and add the remaining coriander leaves and mix/slightly mash the khichdi using the back of the ladle.

Chef tips: If the khichdi is slightly dry and you like it to be more mushy , add 1/4 cup hot water and place the cooker on flame, mix for 1-2 minutes and switch off. 

Your delicious Lauki Khichdi is now ready to be served! You can add a dollop of ghee when you are serving it along with papad, pickle and curd.

This is truly a divine combo. A must try!

Lauki Khichdi

Do try and share your feedback with me.

Happy Cooking!

With love,

Masterchefmom


Macaroni Pie Recipe | Baked Pasta Recipe by Masterchefmom


Macaroni Pie Recipe

Hi Supermoms,

How are you all? 

It has been a while since I updated my blog with fresh recipes. More than the recipes, I missed clicking pictures for the blog. With instagram reels and Youtube Shorts eating up all my time, I am left with very less energy to update the blog. 

I do not want to give any more excuse... so here I am today with a delicious pasta recipe. Pasta is a favourite of both my daughter and me. We are always finding new excuses to try different kinds of Pasta. My daughter going away to college meant I have started having pasta only once in a while now, since my husband likes more of "Desi treats". 

My daughter coming home for Diwali holidays got me back in to the Pasta street. As soon as she came back,  she requested me to make a pasta. I wanted to make something really special for her and thus was born "Macaroni Pie". It came out wonderfully. 

It has simple ingredients which come together to make an irresistibly tasty dish. Instead of macaroni, you can make it with any pasta of your choice. You can also make this completely vegan by skipping milk and adding a few cashews while grinding the cauliflower. You can also skip the cheese and instead add crumbled tofu and bread crumbs. 

You can make this pie in advance for your guests or can even pack it for lunch box. It is also a great weekend dinner idea. 

My daughter loved the Macaroni Pie  and relished it. But the icing was that Raghu, who is not a big fan of pasta also approved the taste. 

So, just go ahead and give this yummy pasta a try!

Macaroni Pie Recipe


Macaroni Pie Recipe by Masterchefmom


Preparation time: 10 minutes

Cooking time: 45 mins

Serves: 3-4

1 cup = 250 ml cup


Ingredients:


For the cauliflower layer:


1 head cauliflower

2-3 garlic cloves

1/8 tsp pepper powder( adjust)

1/4 cup milk

Italian seasoning as per liking (you can always use fresh herbs)

3 tsp olive oil

Salt to taste


For the tangy macaroni layer:


2 tsp olive oil

2 garlic cloves( finely chopped)

1 onion ( thinly sliced)

1/2 bell pepper( thinly sliced)

1 tsp olives( optional)

3-4 tomatoes( ground)

2 cups macaroni 

Salt to taste


For the Cheese layer:


Mozzarella cheese or cheese of your choice

Herbs (dry or fresh) 

Olives 


Method:


1. Add cauliflower and garlic to boiling water and allow it to cook for 7-8 minutes, drain and allow it to cool down.

2. Grind the cauliflower-garlic mixture along with milk to make a smooth and thick paste.

3. Add olive oil, salt, pepper powder and Italian seasoning, mix well and set it aside.

4. To a kadai/pan, add olive oil.

5. Add garlic and fry till it is well browned.

6. Now add thinly sliced onions, bell pepper and mix well.

7.Add the ground tomatoes, chilli flakes, Italian seasoning ,salt and allow the tomatoes to cook well.

8. Add olives, boiled macaroni ( cook as per instructions in the packet) , mix well and cook for just 2-3 minutes and switch off.


Assembling the Pie: 


To an oven safe dish, firstly spoon the tomato macaroni, then add the cauliflower layer and finish off by sprinkling cheese generously. You can garnish with more olives and seasoning. You can even add coloured bell peppers or cherry tomatoes to make it look more vibrant.


Baking the Pie:


Pre-heat the oven at 200 degrees C for 10 minutes. Place the baking dish in the middle tray and bake it at 180 degrees C for 20 minutes. 


Please note that the baking time will vary a little depending upon the oven model you are using. Adjust accordingly. 


You will find that the top layer has browned towards the corner, an indication that the pie is now ready to be served!!


Chef tip : After boiling the cauliflower to make the cauliflower layer, I set aside one cup florets to make oven roasted cauliflower. For that, I simply added some dried oregano and chilli flakes and salt to 2 teaspoons of olive oil and rubbed the oil into the cauliflower florets. Then, I spread them onto a baking sheet and baked them in a pre-heated oven for 20-25 minutes . 


For the garlic bread, I added some crushed garlic, dry oregano, chilli flakes to butter. Mixed it well and spread it on bread. Sprinkled, cheese and veggies on top and baked them in a pre-heated oven for 15-20 minutes or till the cheese is melted. 


I served them along with the macaroni pie. It was just divine. I received so much compliments from my family. It was one stunning looking and delicious meal. 


Macaroni Pie Recipe


I hope you try this recipe soon. Waiting to hear your feedback....


Happy Cooking!


With love,


Masterchefmom


Related Posts Plugin for WordPress, Blogger...