Hi Supermoms,
'Kai Kutthal Arisi' means hand pounded rice. This is the traditional way the rice grain was consumed by our ancestors. The outer shell ( cover) is removed using huge mortar and pestle called 'Ammi' . The cover is thus removed and the rice is ready for consumption. The nutritive value and the fibre content is higher in this semi brown rice than the polished white rice.
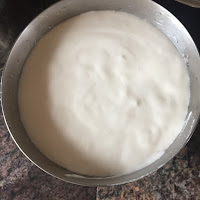
Many do not like the chewy texture of brown rice . For all of them this semi - brown rice is best. The fermentation time might take a little longer than usual idli batter. But make sure to mix the rice and urad dal batter along with rock salt using your hands. Mix well for at least 5 minutes before you allow them to rest.
The same batter can be used to make Dosai , Othappam and Paniyaram also .
Kai Kuthal Arisi Idli :
Preparation time :18 hours
Cooking time : 10-15 minutes
Serves : 10
1 cup = 250 ml Cup
Special Vessel/Equipment : Stone grinder or mixer, Idli plates, Idli Steamer or Pressure cooker ( do not use the whistle), thin and clean kitchen towel
Ingredients :
4 cups semi Brown rice / kai kuthal Arisi/hand pounded rice
1/2 cup poha /aval ( soak along with rice)
1 cup husked black gram/urad dal ( I used the split urad dal)
water ( adjust)
1 teaspoon fenugreek seeds/methi
salt ( to taste, I use rock salt)
Method :
To grind the idli batter:
1. Wash the rice three to four times and soak in water ( approximately 6-7 glasses) for 6-8 hours.
2. Wash the urad dal at least 3 times and soak in a separate vessel
( approximately 2 -3 glasses of water) for 4 hours.
3. Drain the excess water in another bowl and grind the urad dal in a stone grinder ( preferable) for 40-45 minutes or until the time the batter turns white , fluffy and light.
Chef tip : You can also grind the batter in a mixer/mixie, in which case you need to beat the batter for 5 minutes to make it airy and lighter.
Chef Tips : Add water little by little from the drained water . Add more water if required.
To check whether the batter is done, you can drop a small drop of batter on a cup of water. It will float and will not mix with the water.
4. Once you have checked , remove/collect the ground urad batter from the grinder.
5. Drain the excess water from the soaked rice and add it to the grinder and grind the rice to a smooth consistency. This will take approximately 30-40 minutes.
6. Once the rice is ground, remove and add the rice batter to the urad dal batter, add salt and mix well using your hands ( traditional method) or spatula.
7. Beat the batter to make it more airy and allow the batter to rest/ ferment in a warm place
( covered) for at least 6 -8 hours.
8. During winter months you can keep the batter ( covered) on top of your refrigerator or heat up the oven for 5-7 minutes, switch off and place some newspapers inside the oven , place the idli batter inside and keep the door of the oven lightly open .This helps the batter in fermenting.
Method to steam idlis:
Traditional method :
1. Heat an idli steamer with water.
2. Place a moist and clean cloth on top of the perforated idli plates.
3. Spoon batter into the depression of the idli plates.
4. Steam the idlis on medium heat for 7-10 minutes only.
5. To check whether they are done, insert a wet fork/spoon/thin stem of curry leaf plant into the centre of the idlis and if it comes out clean, then they are cooked.
6. Remove the idli plate from the steamer and invert it into a clean plate/work table .
7. Sprinkle cold water behind the cloth and gently remove the idlis.
Modern method :
1. Grease the idli plates ( without perforation) with sesame oil.
2. Spoon the batter into the depression of the plates.
3. Steam cook till done ( steps same as traditional method to check whether done).
4. Switch off and remove the plates from the steamer.
5. Wait for it to cool for at least 5-7 minutes or if you are in a hurry, then show the back of the idli plate in running water ( without getting the idlis wet) and then using a spoon , run it on the side of the idli plate to remove them.
Your idlis are ready to be served . I served them with Chettinadu Milagai Chutney .
For more tips related to making soft and spongy idlis read my detailed post on Idli .
Happy Cooking !
With love,
Masterchefmom


No comments :
Post a Comment
Your comments here...